top of page
ANDREA SOTO
bled anim back to top
Making a Hybrid Animatic in Blender
The aim of this project was to create an animatic for an original story idea using a hybrid workflow that combines 2D and 3D animation techniques. The program I decided to use was Blender because it offers a unique tool called Grease Pencil. This tool allowed me to make and animate 2D drawings within a 3D space, giving me a lot of freedom especially when working with extreme camera movements, as opposed to traditional storyboards where I would need to redraw the backgrounds every time the camera moved.
Through my process I received invaluable feedback and support from my professor Caleb Kicklighter, Dreamworks mentor Jon Gutman, and my peers.
Inspiration
Spider-Man: Into the Spider-Verse and Rise of the Teenage Mutant Ninja Turtles: The Movie are two of my favorite movies and I was blown away when I found some of the animatics made during the production of these movies. Artists Alberto Mielgo (Spider-Man) and Kevin Molina-Ortiz (TMNT) were my two main inspirations for this project. They are masters of the art of mixing 2D animation and 3D layout and made significant contributions to their respective films.

Alberto Mielgo -- Spider-Man: Into the Spider-Verse Storyboards

Kevin Molina-Ortiz -- Rise of the TMNT: The Movie Storyboards
Project Pipeline Overview
-
Gather resources and references.
-
Solidify a story idea and find a supporting soundtrack
-
Create rough storyboards
-
Begin learning and working with Blender Grease Pencil.
-
Refine animation and layout
-
FIN

Concept art from my graphic novel
Finding my story
This was one of the hardest parts of my project. I am writing a graphic novel series and pulled characters and story elements from that, however I wanted this animatic to function as an animated intro or trailer if my graphic novel were a TV series or anime. I had to come up with a way to showcase my characters that would grab a viewer's attention and get them interested in the story. There was also the issue of finding just the right song that would fit the energy I was going for.
For my first idea I tried to introduce each character individually, but the pacing felt rushed and the visuals were unclear. I had about 30 seconds storyboarded before I scrapped it and started over. In the second draft I decided instead to focus on one fight scene for the first half and more personal story bits in the second half. This allowed for slower pacing where I could focus on cinematography, animation, choreography, and introducing each character.

Main characters concept art

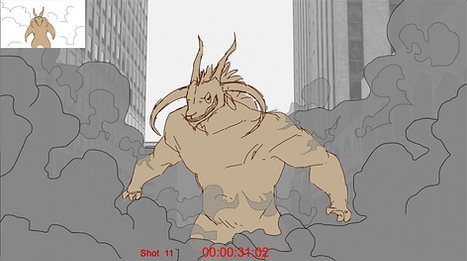
Villain "Goat Man" concept art
Rough Storyboards
For my storyboards I used a program on my iPad called RoughAnimator. I'm comfortable with the program and knew I could use it to quickly draw out my story bits.

Storyboards vs Animatic


Blender's Grease Pencil and Animation
For this project I was learning Blender and Grease Pencil for the first time. The learning curve is a little steep but I did have a very specific goal so I only had to look up tutorials that pertained to grease pencil and using Blender to make animatics.
Here's what my workflow looked like:
1. Set up my workspace to be 2D animation friendly and import storyboards into blender.

3 main windows: Camera View (top left), Storyboards (bottom left), and 3D View/2D Animation Canvas (right). Underneath are the Graph Editor and Dope Sheet that I can easily flip between. To the right is the scene collections and object properties.
2. Agdjust rendering and compositing settings, add music, and set up collections and scenes to manage my assets.


Render Properties:
I learned it was very important to simplify the viewport rendering so that viewport playback played as smoothly as possible.
For compositing it was very important that Transparent under Film was checked. This allowed for the grease pencil render layers to have an alpha channel.
Output Properties:
FFmpeg is the best format for uploading to social media or network uploads. With the following settings I get video that is a useable size and good quality.
View Layer Properties:
Use for Rendering allows you to render your view layers.
With Combined and Z checked you get all of the RGBA and Z values.


Adding music is simple! Open the Video Editing tab, or add it if you haven't already, and just drag and drop your audio file into the sequencer! I only needed my sound track so that's all I had.
3. Begin animating! My Best Practices for using Grease Pencil objects, Cameras, the Graph Editor, and shortcuts.
Taking very rough storyboards and translating them into rough animation and camera moves was a fun challenge. Usually I would just draw over the storyboards and add more frames but now I had to a 3D element to deal with. With grease pencil you can draw 2D planes and move them around in a 3D space. Every shot was pretty unique in how I approached and executed them.
For example, this shot I drew the running character first and animated the grease pencil object to move across the ground at a constant rate. Then I set up the camera to match the character's speed and to zoom in an out as needed.
In this shot I utilized one of the coolest aspects of grease pencil. When you start drawing, you can either choose to draw on a front, side, top plane, or view plane. Drawing from view will create the strokes on a plane perpendicular to the camera. Combined with forced perspective it creates crazy looking drawings in 3D space.
In this shot I utilized one of the coolest aspects of grease pencil. When you start drawing, you can either choose to draw on a front, side, top plane, or view plane. Drawing from view will create the strokes on a plane perpendicular to the camera. Combined with forced perspective it creates crazy looking drawings in 3D space.
Another grease pencil feature is its layers. For this shot, the character and each group of rocks are on separate layers. Each layer can have its own keyframe animation, change in opacity, and even translation. Instead of making a new grease pencil object for each rock pile, I put them in separate layers and translated them towards the camera.

Grease pencil's onion skinning feature is also very handy. Onion skins are "ghosts" of your before and after drawings, allowing you to place marks exactly where you need to or to visualize a line of motion.

Some shots were a struggle to figure out what approach I should take. The ones with a lot of camera movement were especially difficult because I could either draw a simply stick figure and animate it moving around and then figure out how to get the camera to move in 3D space to get the desired composition, or animate the camera and character at the same time and do a sort of dance back and forth until I get what I needed. This particular skill is something I will be working on more in the future. With practice I'll learn what works best and the fastest way to get what I need.
4. Finally, Rendering and Compositing in After Effects
I utilized a timecode effect and Shot counter to make it clear when animation and shots were taking place. I also decided to add the rough storyboards in the top left to provide a comparison.

Technical Issues and Problem Solving
This project was challenging in not only creating a story and animating it, but also in learning Blender as a program and learning new things like using node based compositing. One very specific issue I ran into was needing to make everything that wasn't a character (basically anything that wasn't a grease pencil object) have 0 saturation and lowered contrast. Unfortunately I couldn't just drop in an effect to change all of the background objects. Through an internet search I learned I could use Blender's node based compositing system to split up the background and grease pencil elements into separate scenes and add the necessary nodes.
I spent hours digging through a lot of youTube videos and documentation to eventually get this effect so I compiled a tutorial that goes through the steps I took.

1. I divided my assets into separate view layers: View Layer that contained everything, GP for the grease pencil objects, and city for everything that needed to be greyed out. View Layers are your separated render layers that can be composited back together afterwards.


At the top right you can view, add, or delete view layers. To add/remove assets from a view layer, simply check on or off the check box.
2. Turn on Transparency. VERY IMPORTANT. This allows the view layers to have an alpha channel. Grease Pencil objects will now have a transparent background so they can be composited onto the background.

3. Open the compositing tab, or add one if you haven't already, and add these nodes: 2 Render Layers, Hue Saturation Value, Bright/Contrast, Alpha Over, and Composite. I also liked to have a Viewer node to quickly view the changes I was making. For this node you'll need to turn on Backdrop, which bring up a viewer screen that automatically shows whatever is inputed into your Viewer node.

In the Render Layer nodes, select a view layer. Mine were city and GP. The button to the left brings up a render for that node.


4. Connect the City Render Layer image output into the Hue Saturation Value image input. Do the same for the Bright/Contrast and View nodes. Clicking on the Viewer nodes brings up your image in the Backdrop. Now you can adjust the hue, saturation, values, brightness, and contrast until satisfied.

5. Connect the Bright/Contrast image output into the upper Alpha Over image input and the GP image output into the lower image input. The Alpha Over node allows you to composite an image with an alpha channel OVER a background image.
Lastly, connect the Alpha Over node to the Composite node. This node composites the information into a single renderable layer. Once this node network is set up it will stay with your project.

And that's all! For a seemingly simple setup, figuring this out for the first time was a big challenge.
Despite all of the challenges, this project was a lot of fun. I love telling exciting stories and this was the perfect opportunity to stretch my skills into a new program where I could play with composition, layout, and animation till my heart's content. This is only the beginning and I can't wait to start my next project!
bottom of page